Are the cracks in your parking lot beginning to worry you? Any potholes that seem to be getting deeper week after week? The color in your asphalt fading to grey, and you still remember how black it used to be?
A little asphalt maintenance can go a long way. And the more proactive you can be, the longer your pavement can last. With more than 20 years of experience in this industry helping people just like you maintain their own asphalt, here are our tips so you can get pro-quality results.
When you want more help than just DIY asphalt maintenance tips you find online, we have more free resources you can use to learn about repairing and preserving asphalt.
With that being said, let’s take a look at the jobs you’ll likely be tackling, and how to do them just like the pros do.
1. Crack Sealing Tips

When your asphalt starts to crack, that can mean a number of things. But one thing is certain: your asphalt cracks need to get sealed to keep them from worsening.
Why?
Cracks left to themselves can expand. Water can penetrate and seep into the asphalt foundation. That water can then freeze, weakening the asphalt and its foundation. Long story short: cracks are bad news for your asphalt if you don't fix them!
Let's make sure you crack seal correctly with these top tips:
Crack Filling Tip #1: Make Sure the Weather is Right
For the best results with your asphalt crack repairs, always check your area's weather forecast for precipitation. Make sure there's no rain (or snow) forecasted for the next few days, and that the temperature is above 50°F. These conditions will allow your crackfiller to cure properly.
One thing you should be aware of is extreme heat. When it's too hot outside, the crackfiller may not harden properly. If that happens, you can sprinkle sand on top of it.
Crack Sealing Tip #2: Use the Proper Repair Technique for the Crack
Different cracks require different repair techniques, and it's important to properly identify what types you have.
Shallow cracks that are 1/2" deep or less can be repaired with liquid crackfiller or rubberized crackfiller. If cracks are deeper than 1/2", the crack should be filled with sand until it reaches half an inch in depth, then it can be sealed as if it were a shallow crack.
Alligator cracks are webbed cracks that spread in specific areas, usually where there is heavy load-bearing vehicles. Instead of using a crackfiller that acts as a liquid, for alligator cracks you use a mortar-like material called Gator Patch.
If you're not sure what types of cracks you have, you can contact us for a free pavement assessment.
Asphalt Crack Repair Tip #3: Learn about What NOT to Do
Sometimes, the best way to learn about something is to learn what NOT to do. Knowing the pitfalls will help you see what could go wrong, and how you can avoid it.
If you use a crackfiller melter applicator (like the RY10 PRO or the Gingway MA10) and rubberized crackfiller, you have to melt the crackfiller into a liquid form. And if you're not careful? You can overheat it.
Watch this video for more information on what to do:
Video: Crack Repair Troubleshooting
Crack repairs are step #1 in extending the life of your asphalt. But cracks aren't the only thing that can appear in your parking lot or driveway...
Related Blog: Parking Lot Crack Repair
2. Pothole Repair
Potholes are a common issue in asphalt surfaces, and addressing them promptly can prevent further damage and extend the lifespan of your pavement. Here are some professional tips to help you tackle pothole repairs like a pro.

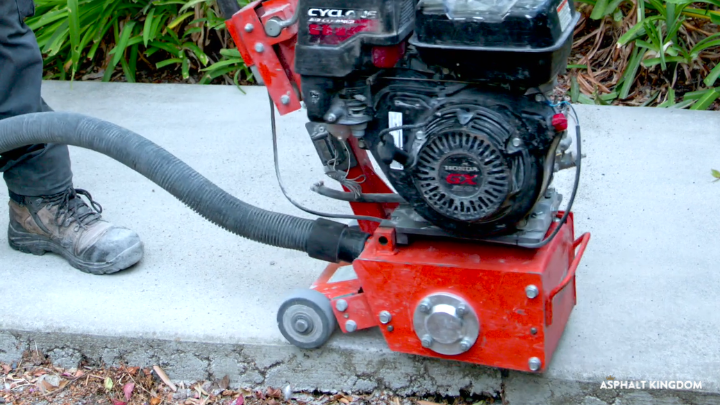
Pothole Repair Tip #1: Clean the Pothole Thoroughly
Doing a job right means prepping correctly. When it comes to DIY pothole repair, it's important to ensure that debris and loose asphalt is cleaned out of the pothole.
It would also be ideal to straighten out the pothole edges to make a longer-lasting repair.
Pothole Patch Tip #2: Add a Durable Foundation
For a more durable pothole patch, you need a reliable, solid base. To do this, add a mix of coarse gravel and sand to the pothole, leaving about an inch for the pothole patch. Tamp down the gravel and sand mixture firmly so it’s solid.
This step prevents the patch from settling over time, and provides a foundation for the cold patch asphalt to sit on top of.
Follow your cold patch's instructions and compact it so you no longer have a pothole.
Pothole Fix Tip #3: Sealcoat after the Repair
Now that your pothole is fixed, that's it, right?
To finish your repair and protect it from the elements, you can take it one step further.
Sealcoating can be applied over your patch and the rest of your asphalt to add another protective layer. Only do this after your patch has fully cured, and only if you have the right temperatures for sealcoating. You can't sealcoat in most of North America in the winter, for example.

Pothole Tip #4: All Patching is Temporary
Most DIY pothole repair methods are temporary, so knowing what to expect from the outset can prevent you from having unrealistic expectations of how long your repair will last.
For the most durable repairs, you will likely need to hire a reputable asphalt contractor who can evaluate your pothole, identify the reasons for the asphalt failure, and provide the proper repair solution.
3. Sealcoating
Sealcoating your asphalt surfaces is a vital part of maintaining their appearance and longevity. Here are some pro-quality tips to help you get it right.

AK Coach Dom Manzo applying asphalt sealer
Sealcoating Tip #1: Repair Asphalt Cracks Beforehand
Imagine you're about to paint a wall, but it's full of nail holes and tiny cracks. You know that if you went ahead with painting, all of the holes and imperfections would show through and all of your work was wasted.
With sealcoating asphalt, it's important to seal cracks to make a solid surface for your sealcoat. The crack repairs will also prevent water from seeping in and causing further damage.
Make sure any gaps in your asphalt are repaired and then cured before sealcoating!
Sealcoating Tip #2: Check the Weather Conditions
Just like with crack sealing, check the weather forecast before starting your sealcoating project. You'll want no rain or precipitation in the next few days — unexpected rain can ruin a sealcoat job!
As for the temperature, the minimum temp for sealcoating is 50°F while the max is 120°F. If the temp is hot outside, you'll want to mist or spray a bit of water onto the asphalt so it cools down. This will also help the water content in the sealer not dry out too fast as it hits your pavement, but you'll still want to work fast!
Sealcoating Tip #3: Choose the Right Sealer
When sealcoating your own asphalt, you'll want to choose a high quality sealer that is effective at protecting against the elements and repels liquids, gasoline, oil, etc.
The different types of sealer are important. Coal tar sealer is banned in many areas and can burn skin; asphalt emulsion sealer is more environmentally-friendly and user-friendly. Oil-based sealer may look good, but it doesn't do much for your asphalt's rejuvenation.
You should look for "airport-grade" or "commercial-grade" sealer, as these have higher standards for durability and longevity.
Sealcoating Tip #4: Sealer Application
For application, you can use a sealcoating machine, which is efficient and less messy, especially for larger areas like parking lots, private roads, and estate driveways.
If you have a smaller driveway, a squeegee or sealer brush will work. Apply the sealer in thin, even coats, allowing each coat to dry before applying the next. It’s better to apply multiple thin coats rather than one thick coat to avoid uneven drying and cracking.
Regardless of how you decide to apply your sealcoat, you'll want to sealcoat the edges of your asphalt first, then work from one end to the other in thin coats.
Sealcoating Tip #5: Stay Off!
After sealcoating, you'll have to block off any traffic and let the sealcoat cure for at least 24 hours. For the best results, avoid heavy traffic for at least a few days to let the sealer fully set and harden!
Related Blog: How Long to Stay Off Driveways After Sealcoating
4. Restriping a Parking Lot

Striping a parking lot with the Titan PowrLiner 850
Fresh lines can have a big impact on the organization and curb appeal of any parking lot. You want them visible, you want them straight, and most importantly, you want them to be noticeable for the drivers in your parking lot.
We have an entirely separate blog for DIY line striping tips! Get them here:
Where to Next With Asphalt Kingdom
Thanks for sticking with us through this blog and we hope you've learned some valuable tidbits on how to improve your DIY asphalt maintenance projects, achieve professional-quality results, and extend the lifespan of your asphalt surfaces.
If you need more detailed how-to's, be sure to check out our free and comprehensive guides:
- Asphalt Crack Repair
- Asphalt Patching Guide
- Sealcoating Asphalt Property Guide
- How to Stripe a Parking Lot
At Asphalt Kingdom, we're committed to providing guidance, resources, and support for you to make your pavement safer, better-looking and longer-lasting. Just imagine us as your lighthouse in the foggy world of asphalt maintenance!
Whether you're sealing, filling, or patching your asphalt parking lots or driveway, we can help you with the tools and knowledge to get your job done right:
- Sealcoating Kits: Protect your pavement from the elements and extend its lifespan.
- Crack Fillers: Prevent cracks from spreading and causing more damage.
- Pothole Patch: Quickly and easily fix those pesky potholes before they get worse.
However, if you'd rather leave it to the pros, consider hiring one of our trusted contractors through the AK Contractor Network. Let the experts handle the heavy lifting while you enjoy more free time:
- Trusted Experts: We connect you with top-rated contractors who know how to get the job done right.
- Quality Workmanship: Make sure your pavement receives the professional care it needs.
- Convenience: Spend more time with your family and less time worrying about your pavement.
Don't wait – act now to keep your asphalt surfaces in top condition!
Not sure where to start?
Take our free pavement assessment, and we can help guide you the rest of the way!


.png?width=200&height=300&name=First%20page.pdf%20(1).png "Start a Business Blueprint")